Interface Guide
Login Interface
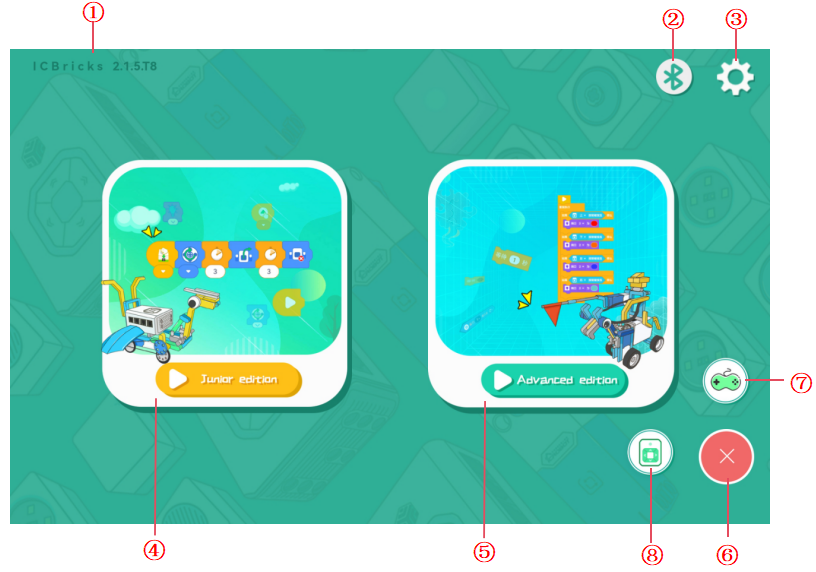
No. |
Name |
Description |
|---|---|---|
① |
Version Info |
View the current software version. |
② |
Bluetooth |
Tap to open the Bluetooth connection window and pair with a target device. |
③ |
Settings |
Tap to configure software language and other options. |
④ |
Junior Version |
Tap to select a project and enter the basic programming interface. |
⑤ |
Advanced Version |
Tap to select a project and enter the advanced programming interface. |
⑥ |
Floating Ball |
Tap to expand the remote and console buttons; tap again to collapse it. |
⑦ |
Remote Control |
Tap to enter the remote control interface for robot operations. |
⑧ |
Console |
Tap to access the console interface to view external device statuses. |
Bluetooth Window
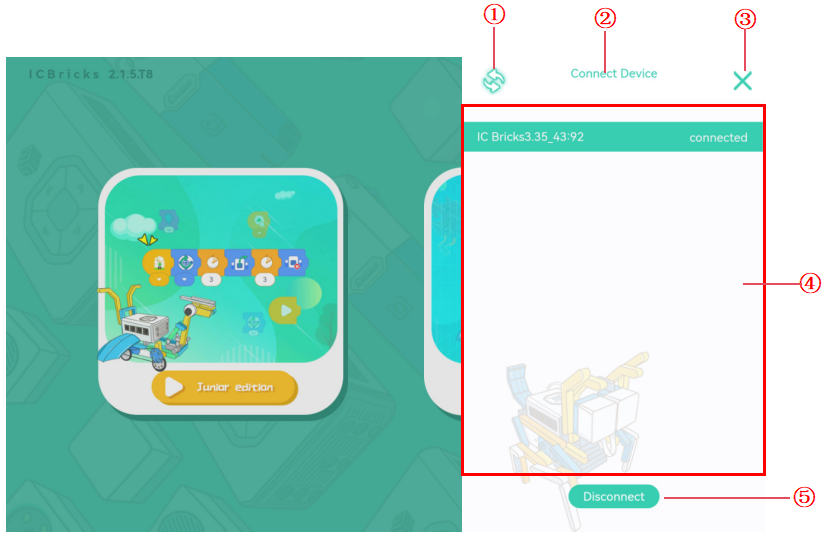
No. |
Name |
Description |
|---|---|---|
① |
Refresh Devices |
Rescan for nearby KIDZBricks devices and update the device list. |
② |
Hidden Function (Bluetooth Rename) |
Tap the text 10 times to enter the renaming interface for Bluetooth devices. |
③ |
Close Window |
Close the Bluetooth window. |
④ |
Device List |
Display all scanned devices. Tap a device name to pair; connected devices are highlighted in green. |
⑤ |
Disconnect |
End the Bluetooth connection with the current device. |
Settings Interface
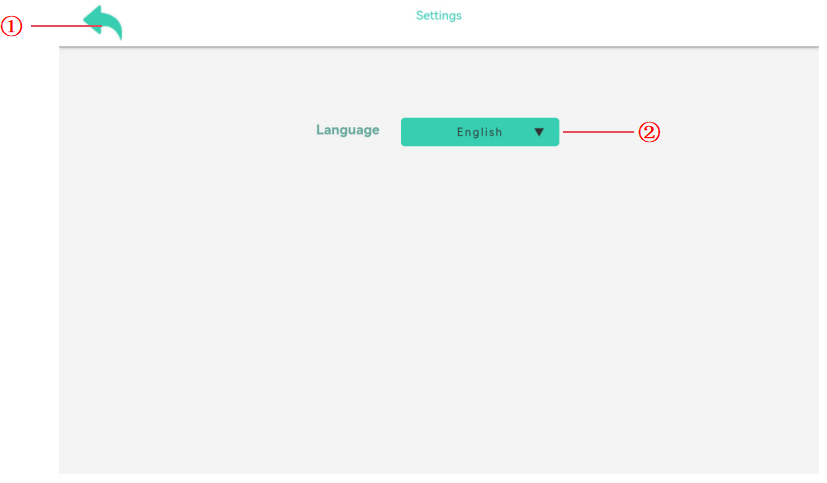
No. |
Name |
Description |
|---|---|---|
① |
Back |
Return to the login interface. |
② |
Language |
Change the software language. |
Remote Control Interface
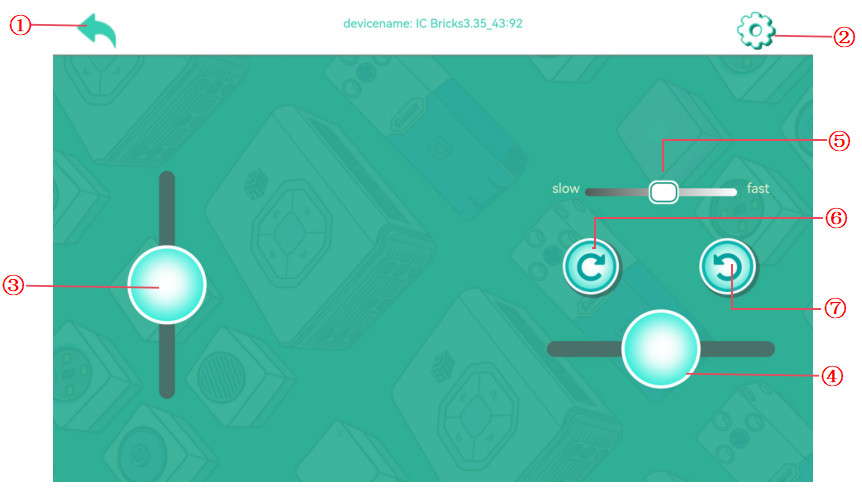
No. |
Name |
Description |
|---|---|---|
① |
Back |
Return to the login interface. |
② |
Settings |
Adjust port settings for custom remote control configurations. |
③ |
Forward/Reverse Slider |
Drag the slider to control the robot to move forward or back. The larger the slider drags, the faster the robot is. |
④ |
Left/Right Slider |
Drag the slider to control the robot to turn left or right. The larger the slider drags, the faster the steering speed. |
⑤ |
Speed Settings |
Adjust motor speeds for specific motion needs. |
⑥ |
Clockwise Rotation |
Tap to rotate other motors clockwise; release to stop. |
⑦ |
Counterclockwise Rotation |
Tap to rotate other motors counterclockwise; release to stop. |
Remote Control Settings Interface
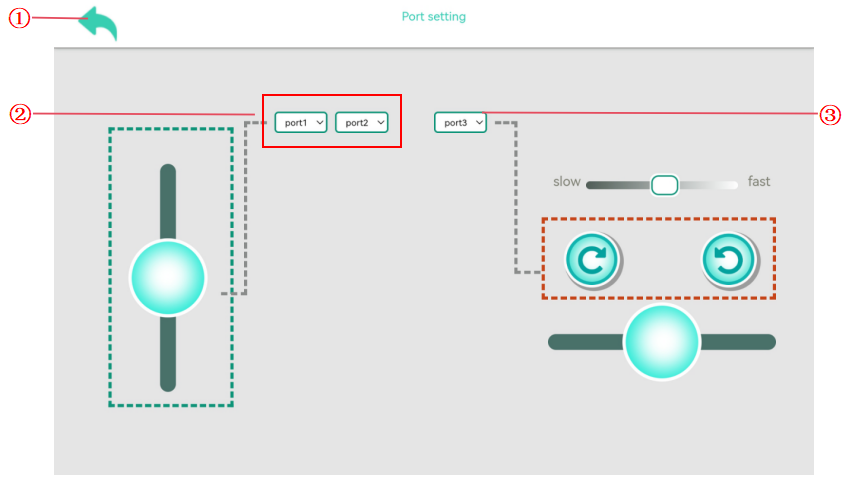
No. |
Name |
Description |
|---|---|---|
① |
Back |
Return to the remote control interface. |
② |
Motor Settings |
Adjust ports for controlling robot movement. |
③ |
Other Motors |
Adjust ports for other motors. |
Console Interface
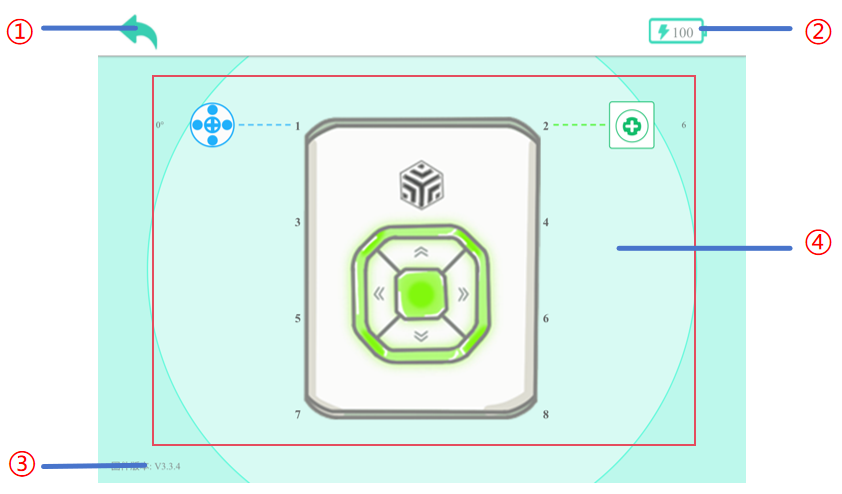
No. |
Name |
Description |
|---|---|---|
① |
Back |
Return to the login interface. |
② |
Power Status |
Display the battery status of connected devices (range: 0-100). |
③ |
Firmware Version |
View the firmware version of connected devices for update checks. |
④ |
Display Area |
Show the status of sensors and actuators, with clickable controls for actuators. |
Beginner Version
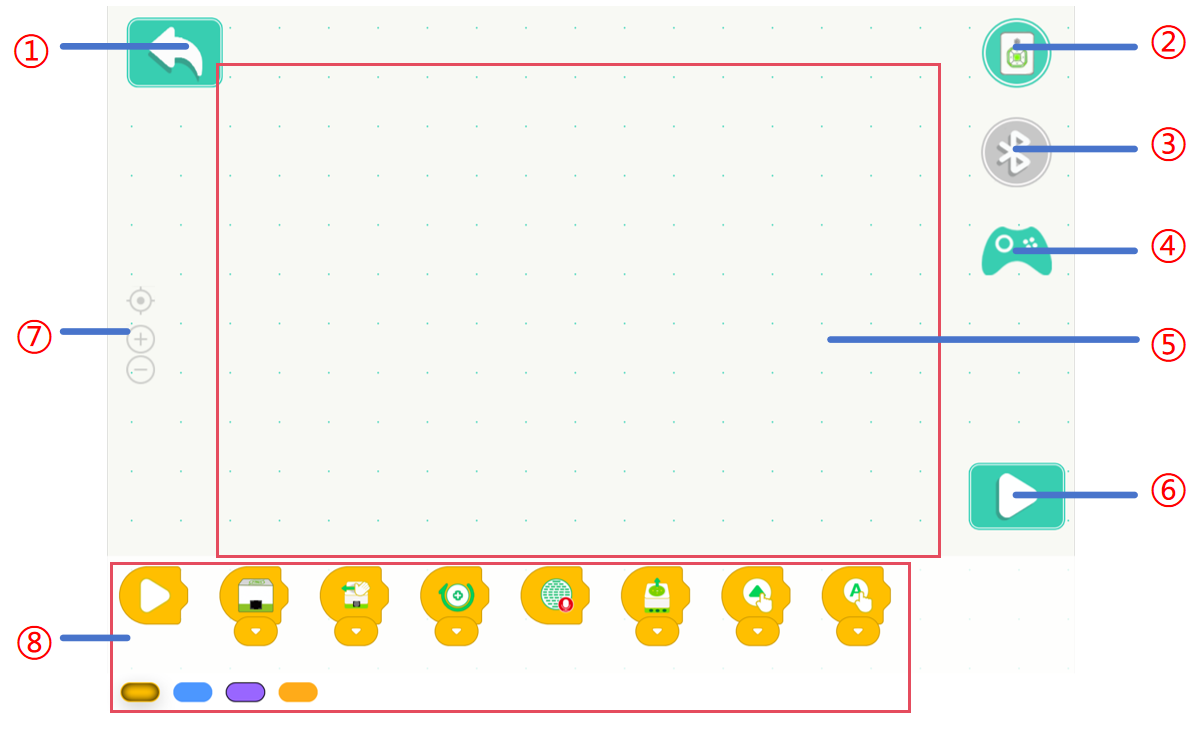
No. |
Name |
Description |
|---|---|---|
① |
Back |
Save the current project and return to the login interface. |
② |
Console |
Click the console button to view the port information of the current device for easy debugging; click the button again to retrieve the console. |
③ |
Bluetooth |
Open the Bluetooth connection window to pair with a target device. |
④ |
Remote Control |
Open the remote control window to assist with programming. |
⑤ |
Programming Area |
Drag and drop blocks to create programs. |
⑥ |
Run |
Start or stop the program edited in the programming area. |
⑦ |
Zoom Control |
Adjust the size of programming blocks for better visibility. |
⑧ |
Block Area |
Classified display of various functional blocks, quickly find the required sensors according to the color, convenient and efficient selection and use. |
Advanced Version
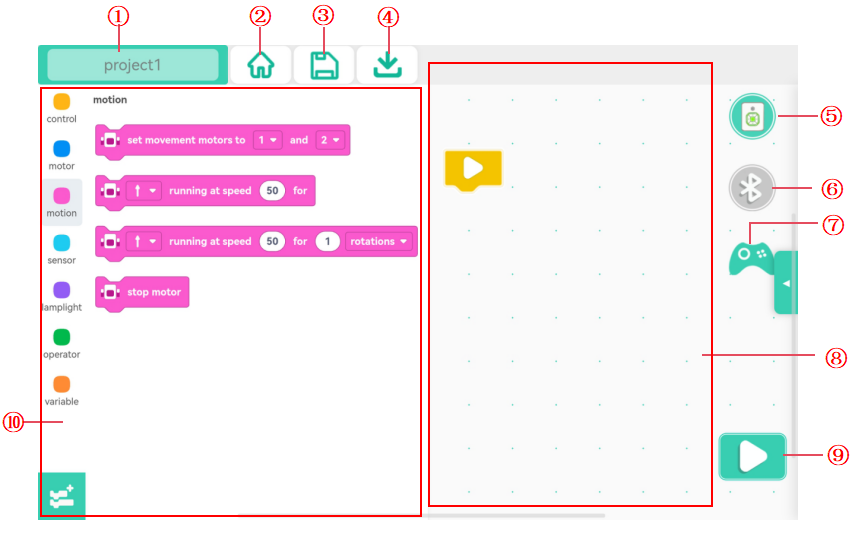
No. |
Name |
Description |
|---|---|---|
① |
Title |
Modify the title of the current project. |
② |
Back |
Save the current project and return to the login interface. |
③ |
Save |
Save the current project. |
④ |
Download |
Download the program to the hub. |
⑤ |
Console |
Click the console button to view the port information of the current device for easy debugging; click the button again to retrieve the console. |
⑥ |
Bluetooth |
Open the Bluetooth connection window to pair with a target device. |
⑦ |
Remote Control |
Click the remote control button, pop up the remote control window, and assist the programming operation |
⑧ |
Programming Area |
Write the area of the program, drag and drop the building blocks to the programming area, and complete the program writing. |
⑨ |
Run |
Download the program to the hub and start execution; click again to stop the program. |
⑩ |
Block Area |
Classified display of various functional blocks, quickly find the required sensors according to the color, convenient and efficient selection and use. |
Model Training Page
Model Training Selection Interface
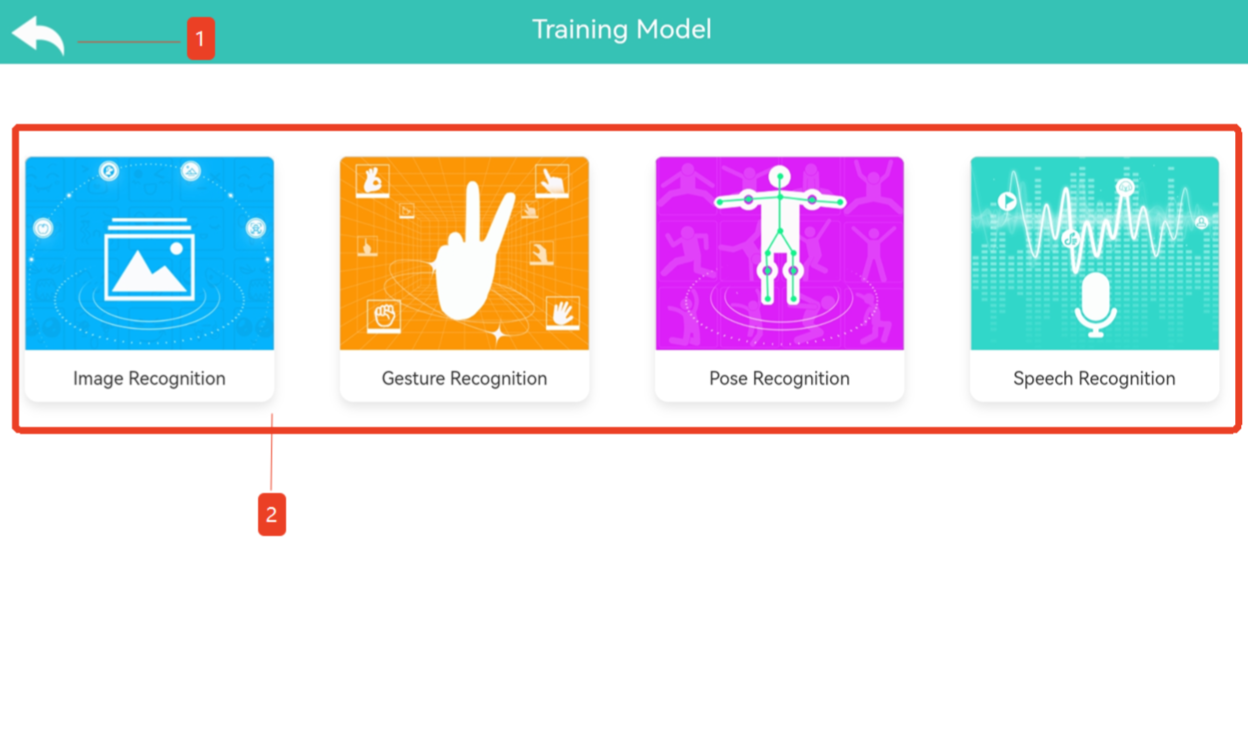
No. |
Name |
Description |
|---|---|---|
① |
Back |
Click Back to return to the Advanced Programming interface. |
② |
Select Training Model |
Click to select one of the following training models: Image Recognition, Gesture Recognition, Pose Recognition, or Speech Recognition. After selecting a model, you will be taken to the Project Management interface. |
Project Management Page
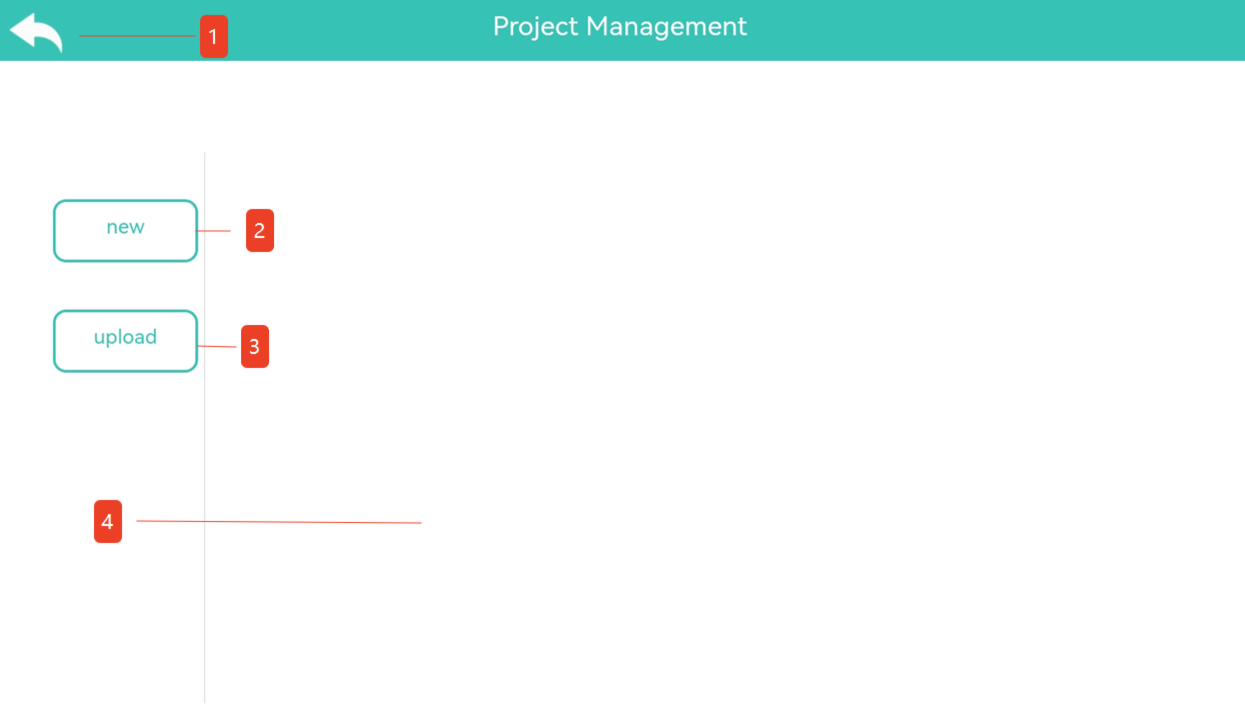
No. |
Name |
Description |
|---|---|---|
① |
Back |
Click Back to return to the Model Selection Interface. |
② |
New |
Click to create a new project. After clicking, select one of the followingtraining models: Image Recognition, Gesture Recognition, Pose Recognition, or Speech Recognition. |
③ |
upload |
Click to upload a project from your local device. |
④ |
Project History |
Displays the list of previously created or uploaded projects. |
Image Training Page
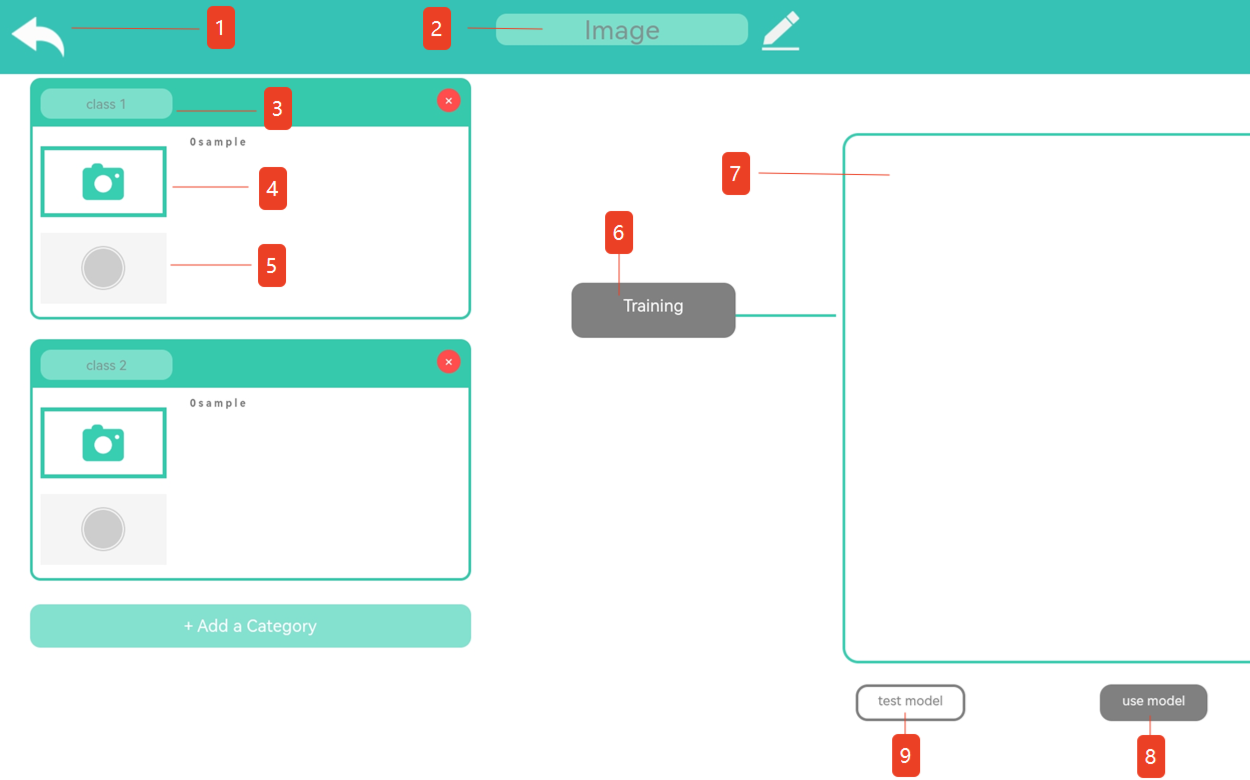
No. |
Name |
Description |
|---|---|---|
① |
Back |
Click Back to return to the Project Management Interface. |
② |
Image Name |
Displays the project name. The project name can be modified. |
③ |
Category |
Displays the category name. |
④ |
Camera |
Opens the camera view to capture image samples. |
⑤ |
Capture |
Press and hold for 1–2 seconds to capture an image. |
⑥ |
Start Training |
Click to start model training. |
⑦ |
Test Area |
During model testing, displays the image capture status and recognition results. |
⑧ |
Test Model |
Click to test the trained model. |
⑨ |
Use Model |
Generates programming blocks for the trained model. |